JAMF
BUMC IT is pleased to announce that your Boston University computer has been enrolled in Jamf Pro, a leading platform for managing Apple devices.
What is Jamf Pro?
Jamf Pro is a leading platform for managing Apple devices. Jamf Pro augments existing platforms in use by Client Technology Services and combines inventory data with the ability to deploy software, distribute settings, and respond to security threats.
What is Self Service?
Self Service is an application that offers functionality similar to Apple’s point-and-click App Store. Client Technology Services can publish commonly requested software, printers, links, or troubleshooting tools for you to access without requiring administrator assistance.
What changes will Jamf Pro make to my Mac?
Jamf Pro is designed to be unobtrusive while providing additional support functionality. The most notable additions to your computer will be:
- The installation of a Mobile Device Management (MDM) profile. This enables critical functionality for the platform and allows Client Technology Services to leverage enterprise features included with macOS.
- The installation of the Self Service application. As mentioned, this application makes it easier for you to manage common software on your computer.
Does Jamf access or report information about my files?
No, Jamf does not access or report on any personal files or their contents. Jamf may access select system preference files, as defined by Client Technology Services, during inventory routines. Jamf will also report on other holistic measures, such as hard drive utilization and installed software.
For additional questions or assistance, please contact BUMC IT by calling 617-358-4540 or by emailing bumchelp@bu.edu.
JAMF Pre-Enrollment
If your BU-owned Mac has been pre-enrolled by BUMC IT, please follow the directions below to complete the enrollment.
- Using the Dock, Launchpad, or Applications folder, locate and open the newly installed Self Service app. Self Service uses a red circle icon with a silhouette of Rhett in the middle, as pictured below.

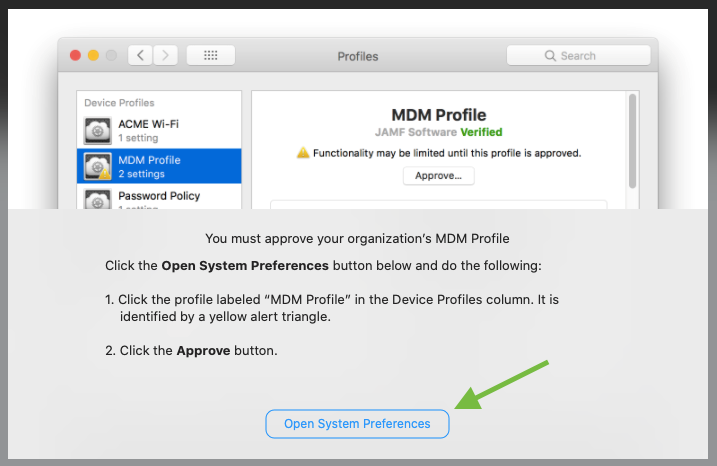
- When prompted to approve Boston University’s MDM profile, click the “Open System Preferences” button.

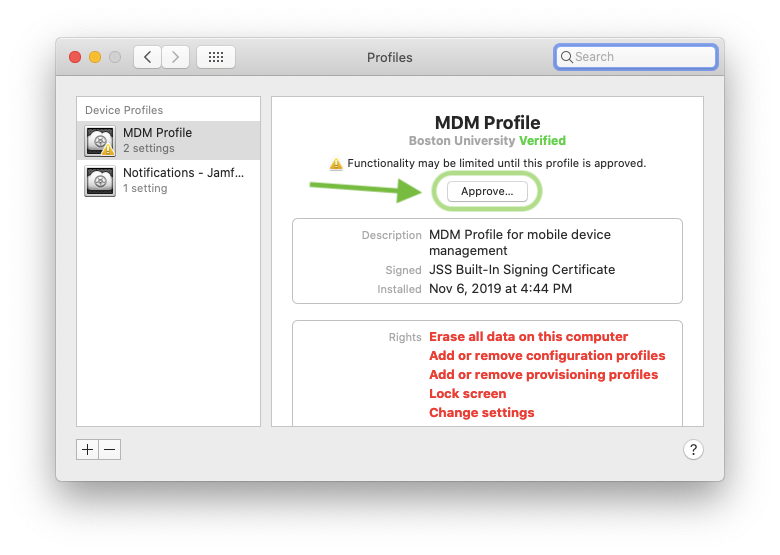
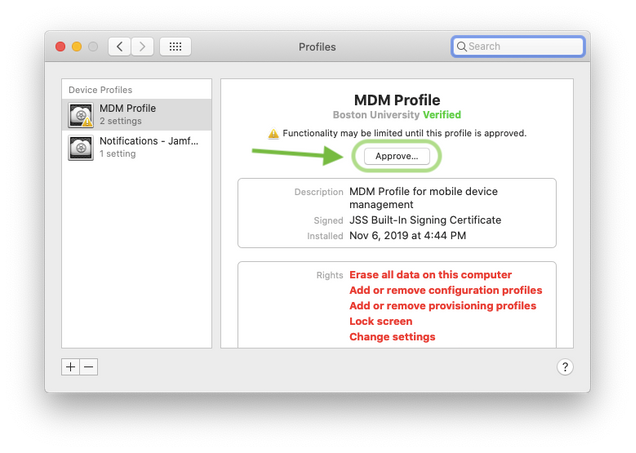
- Select “MDM Profile” from the list on the left, if it is not already selected. This profile will be marked with a yellow alert icon.
- Click the “Approve…” button. Click “Approve” in the confirmation window that appears.
- Enrollment is now complete. You can now close System Preferences and continue using your computer.