EndNote
About EndNote
- EndNote is a bibliographic citation manager; a piece of software designed to collect and format references used in scholarly writing.
- BU does not provide individual subscriptions to EndNote, but the program is installed on some computers in the Library.
- Students can purchase EndNote at a discount.
- You can download a 30-day trial versionof EndNote if you would like to test it.
- Some good EndNote tutorials are available on the EndNote site.
Setting Up A Library
- Click on the EndNote program icon on the desktop.
- Upon opening EndNote, the Dialog Box provides three options: “Create a new library”, “See what’s new in this version” or “Open an existing library”.
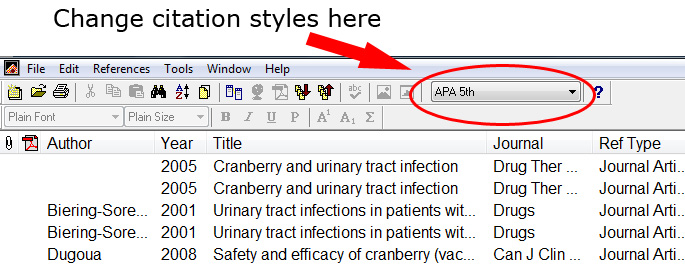
- If you choose to open a new library, a blank library window will open. Once you add records, a summary of each citation will appear in the upper library window. Below the library window is the preview pane – here a selected citation will appear in the style chosen (for example, APA or JAMA). Styles can be changed from the toolbar.
Entering Citations Manually
- This method is the least efficient way of using EndNote. It is best to only use it when citing nontraditional information sources, like websites.
- From the “References” menu, choose “New Reference.”
- A blank reference window will appear. In the “Reference Type” drop-down box, choosing a different type determines which fields show up in the blank reference because different sources require various amounts of citation information. For example, if you choose “Web Page”, fields will appear to paste in the URL and access date.
- To save the reference, close the window or select save from the File menu.
- The reference can be edited again by selecting it from the library window.
Back to Main EndNote Page
Connecting Directly To A Resource
- Under the “Tools” menu, choose “Online Search”. [NOTE: This is called “Connect” in versions of EndNote previous to XI]
- The last four information resources which have been utilized are displayed by default. If no resources are displayed or if the desired resource is not shown, click on “New Search”.
- There are approximately 1,800 resources one can connect to directly. However, databases that are protected by password access (such as MEDLINE) are difficult to use in this way.
- Choose the Resource you would like to search, for instance the Boston University library catalog, which appears as “Boston U”.
- A “Remote Search” window will appear from which you can run a search of your selected resource.
- If you need more fields click on “More” at the bottom of the window and you will see the options to add fields (or insert or delete them).
- Once you run your search, a “Confirm Remote Search” box will appear, asking you to select the number of references you’d like to send to EndNote.
- The references are not automatically sent to an EndNote library. Instead, you will see them on an intermediary window, where you have the option to sort the references by date, author, and other options.
- You can send all of the references to the library by clicking on “Copy All References”, or by selecting certain references. A drop down menu will appear where you can select the appropriate library.
Back to Main EndNote Page
Attaching PDF’s And Other Files
- EndNote can be used to organize PDFs or other types of files associated with citations.
- Make sure the PDF or other file (for instance, an mp3 or jpeg) is saved on your computer.
- Click on the citation for this attachment in the Library Window
- Scroll down to “File Attachments” (called “PDF” in versions before EndNote XI).
- Left click, then right click in this field.
- Under the “File Attachments” option, choose “Attach File”.
- Browse your computer to find the appropriate PDF or other file type.
- Switch back to the Library Window. This record now has an icon (either a paperclip or PDF) indicating that a file has been attached. EndNote records can be sorted using this element.
Back to Main EndNote Page
Using Microsoft Word’s “Cite While You Write” Feature
- Open up Microsoft Word.
- If EndNote is properly installed, you should see the EndNote toolbar across the top of Word. If the toolbar doesn’t appear, go to the “View” menu and select Toolbars to see if EndNote is an option there. If you don’t see EndNote, but should, you may want to consult this EndNote FAQ page.
- Type a sentence.
- Switch back to EndNote and choose the corresponding citation from the Library Window by clicking on it once.
- Switch back to Word. Under “Tools” and “EndNote#”, choose “Insert Selected Citation(s)”. The citation you have just selected should now appear in the Word Document, formatted as specified in the “Bibliographic Output Style” drop-down box.
- Like many other menus in EndNote, the last four or five citation styles which have been used are listed here by default. Use “Browse” to find other styles.
- You can choose multiple citations by clicking and holding down either the Shift key (for adjacent records) or Control (for non-adjacent records).
- A list of references, which can be used as a bibliography, will appear underneath the sentences you are citing.
- EndNote can also change formatting on the fly. For example, if your thesis is formatted in APA and you want to publish it in a journal that uses NLM style, then you can use EndNote to change the style (provided you originally wrote the paper and citations using the “Cite While You Write” feature).
- To change the formatting, in the “Tools” menu, click “EndNote” and “Format Bibliography”.
Back to Main EndNote Page
Creating A Free-Standing Bibliography
- If you are not using the “Cite While You Write” feature in Word, you can copy and paste the text of a bibliography in EndNote into any word processing application or text editor.
- Choose an output style from the “Bibliographic Output Style” drop-down menu.
- Right-click on the appropriate citations, and choose “Copy Formatted”.
- Switch back to your document and “Paste”.
Back to Main EndNote Page