Vectors, Protocols, and Cells
So many cells, so little time…..
Requesting our cells is easy, click here for details!
Differentiating iPSCs in your own lab is a little harder, but we’ll show you how:
For detailed protocols click here!
Or take our annual hands-on 1 week course! Sign up through the CReM iPSC Core webpage.
Vector Kitchen
Please visit our PROTOCOLS page for all protocols, including ESC/iPSC lung differentiation, lentiviral packaging and titering, or intratracheal lentiviral transduction of lung macrophages!
Vector maps and sequences are available for free download as genbank formatted .pdf files by clicking on the relevant link below for each vector.
Some of our vectors are also available from Addgene, where our PI, Dr. Kotton, serves on the Addgene Board of Directors.
 Find Darrell Kotton Lab Plasmids |
These and other vectors are also available to Boston University Investigators at our CReM vector core webpage, please visit here for a more complete inventory.
For information on our iPS cell bank, please visit our CReM iPS Cell Core website.
Gene Editing Plasmids:
p2200 MUC5B-TdTomato-pDTA-TK DV
Lentiviral Vectors:
pHAGE CMV-GFP-W
pHAGE CMV-Luc-W
pHAGE Ef1aL-GFP-W
pHAGE CMV-hAAT-W
pHAGE EF1aL-hAAT-W
pHAGE CMV-dsRed-UBC-GFP-W
pHAGE UBC-hAAT-IRES-ZsGreen-W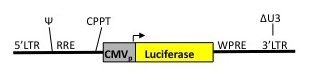
pHAGE2 EF1aL-mSTEMCCA-W-loxP
pHAGE2 EF1aL-hSTEMCCA-W-loxP
pHAGE2 Tet-mSTEMCCA-W
pHAGE PGK-GFP-IRES-Luciferase-W
pHAGE hSPC-dsRed-W
pHAGE hSPC-GFP-W
pHAGE NFkB-TA-Luciferase-UBC-GFP-W
pHAGE NFkB-TA-Luciferase-UBC-dTomato-W
pHAGE RSV-eGFP-W
pHAGE RSV-GCaMP6f-W
pHAGE RSV-GCaMP6s-W
pHAGE RSV-tdTomato-2A-GCaMP6s-W
pHAGE RSV-tdTomato-2A-GCaMP6f-W
pHAGE2 EF1aL-Cre-IRES-NeoR-W
pHAGE-EF1aL-TagBFP-W
W=WPRE sequence; L=long version of promoter
Background on pHAGE: A third generation lentiviral vector
The lentiviral system we employ is based on an HIV-1-based backbone, named ‘pHAGE’ (standing for plasmid HIV-1 Alex Gustavo George Enhanced) originally developed in the laboratory of Dr. Richard C. Mulligan at Harvard Medical School. Dr. Kotton worked with the original pHAGE backbone during his postdoctoral fellowship in the Mulligan laboratory and the backbone has since been adapted to express the transgenes indicated on this page.
The third generation lentiviral vectors employed in our studies are typically pseudotyped with a VSV-G envelope that allows stability and tropism for cells of multiple species including mice. The engineered virus is replication incompetent and has a self-inactivating viral promoter (deleted U3). This ensures that, after integration in the target cell genome, only the internal promoter of interest is active and no further viral replication or infection occurs. A woodchuck hepatitis virus post-transcriptional regulatory element (WPRE) and cPPT is included in each vector to increase gene expression levels in transduced cells.
Several of the lentiviral protocols may be downloaded here by clicking on protocols.We have previously published a detailed description of the lentiviral backbone and technique for packaging high titer virus for in vivo studies. Regarding, expected titering results:
A. There should be a 100-fold difference between unconcentrated and concentrated virus. That is, 0.01 uL concentrated ~ 1 uL unconcentrated, 0.1 uL concentrated ~ 10 uL unconcentrated, and 1 uL concentrated ~ 100 uL unconcentrated.
B. Titering calculations using the FG293 transduction method assumes that FG293 cells are infected with perfect efficiency; so it is assumed that 1 virion added results in 1 FG293 cell transduced. Hence, if concentrated viral supernatant added were plotted against percent transduced FG293 cells, this would result in a straight line (linear relationship) if this assumption were true. However, often the well with the most virus or the least virus falls outside this linear range for technical reasons: e.g the well with the most virus added has saturated the system (e. g. more than one virion added per cell). The titering calculation should be performed on the two data points that are in linear range and averaged. The outlier is not used in the calculation.
How to Clone into the pHAGE vector backbone

Cloning into the pHAGE vector backbone is relatively simple. We have single promoter versions as well as double promoter and IRES-containing versions designed to accomplish single cDNA or dual cDNA vector expression. The plasmid backbone is modular with NotI and BamH1 sites flanking the first gene expression cassette (allowing any cDNA to be cloned into any pHAGE vector after attaching 5′ NotI and 3’BamH1 sites to your cDNA of interest). To design primers to add these sites to your cDNA, see the suggestions below. Also please refer to our CReM protocols page for a free downloadable .pdf version of this protocol as well as many other useful lenti and stem cell protocols.
Primer design for cloning genes into the lenti backbone:
Positions for cloning: 1st position: promoter: spe1/Not1
1st gene coding sequence (CDS): Not1/BamH1
NB: Not1= GCGGCCGC and Kozak consensus sequence= GCCRGCCATGG (R= a purine; A or G); so a 5’ oligo for PCR of a gene to clone into position one should add NNN-GCGGCCGCC in front of the ATG start codon for that gene thus adding the Kozak consensus sequence with embedded Not1 site onto the 5’ end of the gene! (NNN= three random nucleotides {e.g. TTT} in front of the restriction site to allow Not1 enzyme to cut efficiently.
2nd position: promoter: BamH1/Nde1
2nd gene CDS: Nde1/Cla1
NB: Nde1 enzyme requires 7 base pairs in after the restriction sequence for efficient cutting. Also beware CMV promoter has an internal Nde1 site so this site will not be unique when working with CMV containing constructs. Also ClaI in certain context gets dam methylated (see other protocol titled ClaI dam methylation).
How to design primers using Vector NTI: Enter sequence of your gene. Start with the 5’ (upper) primer. Paste about 40 base pairs of the 5’ leading end of your sequence into the oligo list. Add the restriction site in front of your sequence with extra leading base pairs (e.g 3 extra base pairs for not1 to allow cutting; don’t forget to add kozak consensus sequence in front of ATG for genes). Save this sequence in the oligo list as’ oligo.
Next analyze and trim the oligo: In the oligo menu click analyze. Remove the extra (non- complementary) leading sequence that you are going to add to the 5’ end of the gene as this will not bind to anything on the first PCR cycle: click analyze. Begin trimming bases away from the 3’ end of the sequence until the Tm is about 60 degrees. Paste back the 5’ leading sequence that you want to add to the gene during PCR. Save this and analyze it for hairpins, dimmers etc.