In Vivo Imaging Core Facility Methods and Protocols
Basic Imaging Tips
1) Biology: Preparing your experiment
- Discuss your experiment with the Core Director to determine optimal combination of animals and imaging products.
- Plate a black well plate (Corning 96-well Flat Clear Bottom Black Plate, catalog #3603) with dilutions of your imaging product in vitro to ensure your signal is detectable before attempting in vivo experiments.
- Recommended animals: mice are preferred as we currently carry equipment for these animals; if using rats, researchers must bring their own nose cones if they wish to use the XGI-8 Anesthesia System.
- In our IVIS Core, we have not yet used larger mammals, such as rabbits, cats, or chinchillas, but shallow tissue in these animals (up to ~2.5 cm maximum depth for the strongest signal) has been imaged successfully in other IVIS Spectrum Instruments. Feel free to contact the Core Director with other animal questions.
Some Suggested Protocols:
- See ASC website for injections techniques
- D-luciferin Preparation Protocol
- Caliper Intraperitoneal-Injections
2) Acquisition: Optimizing and Imaging Protocol
Bioluminescence
Note: if you are performing an experiment using both bioluminescent and fluorescent reporters, always image fluorescence BEFORE bioluminescence as luminescence can emit in the same range as some fluorophores (particularly reds) and may interfere with fluorescent signal.
-
- Determine your optimal in vivo imaging time by taking incremental images. Typically for firefly luciferase, luminescence does not reach a detectable radiance until after 10 minutes .
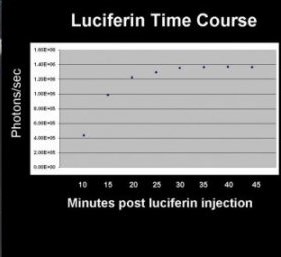
- Use the control panel to either manually set or use the software’s Imaging Wizard (under sequence setup) to automatically set imaging parameters. Note that luminescent images often require longer exposure times and a lower Fstop (a wider aperture allows more light to reach the CCD) than fluorescent images. Ideally, images should take no longer than 5 minutes of exposure time. Auto exposure is recommended to find optimal exposure conditions as set automatically by the CCD camera.
- Determine your optimal in vivo imaging time by taking incremental images. Typically for firefly luciferase, luminescence does not reach a detectable radiance until after 10 minutes .

- Use Sequence Setup to take multiple images while changing one parameter per image.
Choose the time point at which the measured signal value in total photon flux “plateaus” (remains nearly the same value) as the following image.
Fluorescence
- Determine maximum signal strength either manually or automatically using the Imaging Wizard. Note that fluorescent images often require a quicker exposure time, a larger Fstop, and specific emission and excitation filters. Also keep in mind that animal tissue can generate autofluorescence, so background subtraction may be necessary
- Take a sequence of images (if the wizard has not already prompted you to do so)
- Choose best filter set image (by comparing signal to noise ratios of all images in sequence) for analysis or move on to background subtraction features:
– Adaptive FL subtraction
– Image Math Tool
– Spectral Unmixing
Advanced Imaging Tips
3D Reconstruction
- Using Living Image 3.2 software’s 3D reconstruction feature, cell number can be quantified. To do this, an in vitro measurement of a stably integrated cell line of interest must be taken using the camera. Because of algorithms in the software that correct for tissue obstruction, this in vitro measurement can then be correlated to the signal measurement obtained from a 3D reconstruction.
- The Living Image 3.2 software has the ability to locate the “center of mass” of signal quite specifically relative to the animal topography that is generated for a 3D reconstruction. Typically, at the end of an experiment, it is important to sac and dissect the animal to confirm signal location. The software provides millimeter measurements in the side panels, which can be used to determine the depth of signal from various surfaces of the animal.
- Organs can be imaged separately after dissection for comparison with in vivo images and for confirmation of source location.
- Remember that animals may be euthanized in the IVIS Core Facility (W914), but dissections must take place elsewhere.
How to Schedule
Please login to iLab system to schedule equipment time or services. For new users please follow the steps outlined in Information for New Users.
Contact
Francesca Seta, PhD
Core Director
Evans Biomedical Research Center, X-Building
650 Albany St. 7th Floor, Room X-720
Boston, MA 02118
(617) 358-7814| setaf@bu.edu
Location
In Vivo Imaging Core Facility
Boston University Chobanian & Avedisian School of Medicine
Center for Advanced Biomedical Research, W-Building
700 Albany St., 9th Floor
Boston, MA 02118
View BUMAPS